Tuesday, December 27, 2016

Here there be dragons!

Really, what fantasy medieval kingdom is complete without dragons? Dragons, as a topic for writing, presents all sorts of fun approaches. Perhaps a story will be thrilling with characters fending off a terrifying beast, or a gentler approach with misunderstood dragons and budding friendships. The sky is limit in creative writing.

When I am on the hunt for a new project or the next unit I need to tackle, I want it to be along the current classroom theme. Persuasive writing was up next so the challenge was to connect it to the fantasy/medieval theme we were immersed in. What better way to bring dragons into the fold? Hence, Dragon Persuasive Writing- with OREO format , was born.


To allow creative expression, but focus in on writing persuasively, students have three choices of prompts to choose from. Whether desperate, clever, or beseeching, the persuasive tone will change depending on which direction the student will take in reasoning with their dragon.


Creative writing can be difficult for students, even with a fun prompt to nudge them on the way. Included is a teacher's example for a different dragon persuasive situation, both a filled out graphic organizer and a written example. Students have a dragon writing paper to complement their final draft and to color as personality suits. The graphic organizer follows the OREO format, which stands for Opinion, Reason, Examples, and Opinion Restating.


Why stop at one prompt? Time allowing, students could complete the other two prompts and the lesson could shift to difference in tone in persuasion. All in all, I wish your students eloquence in their attempts to persuade their dragon. May their ventures end well!


For more dragon writing fun, check out Dragon Profiles: Creative Writing.


More medieval and fantasy resources at my TeachersPayTeachers store here.


Monday, December 26, 2016

Different Answer Locations on Number Lines

Number lines are helpful for solving addition and subtraction problems, but what happens when the answer on the number line isn't at the end? Many of my students would get stuck on solving number lines because they would only look for the answer at the end. Well, that is just great and fine when you have an equation like this.


This is the most common type of addition problem that is used so often that students hardly give it any thought. The answer is at the end of the number line. Once students are familiar with solving this type of problem on a number line, they tend to go into auto mode. Add, answer at the end. Add, answer at the end. Enter in the second type of addition problem.


Not so easy this time! Students cannot find the answer by adding the numbers together. The answer lies in the middle and solving to find the answer is a bit different from the main type we are used to. What I love about this type of problem is that there is less auto mode in solving. Students who try to auto solve like before end up with the answer 113, which is information already known in the equation. This is why I focus on where the variable is when teaching. Look for the variable, that's what you are trying to find. Where it is matters in how you solve it!


The third type involves finding the variable at the beginning of an equation. As such, the answer on the number line with be at the beginning! Yes, the problem is addition but you solve it by working backyards with subtraction. Gotta love those inverse operations! This type of problem can be confusing for students since they will not add at all to find the answer. I like to model out a problem with manipulatives in my hand when introducing this problem type. I have some chocolate candy in my hands. I add another 3 pieces. Look! I have 5 in my hand! How many did I have at the start? Working backwards and taking out what was first added, the kids can easily subtract it to get the answer and we use that to work on more appropriately labeled problems.


Most of the first trimester is pirate-themed. Inevitably any resources I make for content taught during the first trimester is pirate-themed. And why not!? It's fun and the students love it. My video resource, Treasure Number Lines: Where is the Answer on a Number Line? is pirate-themed and covers the 3 addition problem types just mentioned. Each problem-type is taught step by step and puts the bare equation problems into some context.


The video also comes with a worksheet for each equation problem type following the same format as the video. Check it out here!

Friday, December 23, 2016

A Whole Lot of Castle!

My newest adventure in the world of resource making has been the largest to date! 59 pages! On what, might you say? An awesome castle model project is debuted, Castle Architect: An Area and Perimeter Project. Yes, I know this is really my first post on resources, but blogging on it is a new addition.

Previous years, I used a castle model that was really too large for the math project I had in mind. I have always wanted to make my own to fit my classroom needs and viola, here it is!


The model is a stone keep castle with a keep, the stone building in the middle, and surrounding curtain wall with towers. The project focuses primarily on area and perimeter but has a host of other skills such as counting by fractions (halves), measuring to the nearest centimeter, writing equations, using an area model, adding large sums, and more.


The castle is completed in three stages. The first stage focuses on the floor plans for the keep. For each floor, students practice writing equations for the area and perimeter of each room before finding the area of the whole floor using an area model.....or not if a different multiplication method is preferred. More on area models later! A helpful teacher's example is included to use whole class before jumping in to the two floors of the keep. (The teacher's example is a freebie to check out the project, by the way! Go ahead and help yourself!)


The second stage features the Castle Architect Book with a page dedicated to each and every type of castle wall in the model. Students measure and separate the battlements on top of the wall from the main area of the wall on the real model and keep track of measurements and calculations in the Architect Book. Irregular rectangular area practice? Why, yes, indeed! I love projects that combine multiple math skills. It feels more purposeful than just endless worksheets. Students find the area of each wall of the castle before completing a summary page to find the area of the whole castle!


The third stage is really what the students are waiting for. The castle model, finally! Now that the math is out of the way.....let's build a castle! 😉 You know that's what they are thinking, right?! Starting with the keep, students insert the floor plans to the model keep and build the curtain wall around it.


You can see the second floor plan in the picture to the right. (Ignore my cute slipper on the stair, please!) The first floor is visible through the keep doors or when you pick up the keep. You can glue it down too and have it tilt up to see the floor plan.


This, ladies and gentlemen, is the final product in all its glory. A castle model that fits so nicely on the desk. The previous version did not and required a lot of floor space. While I am proud of my previous resources for sure, for some reason I am really attached to this one. It's a castle!! It makes my inner child cheer!


So....head on over to Morsel Tidbits to check out this project if you are interested.

Find it here!

What? Just the castle model you say? Sure, you can find the castle model on its own right here for those fantasy or fairy tale writing projects, or book reports, or other fun themed projects. To end, I'll just leave this picture right here too.


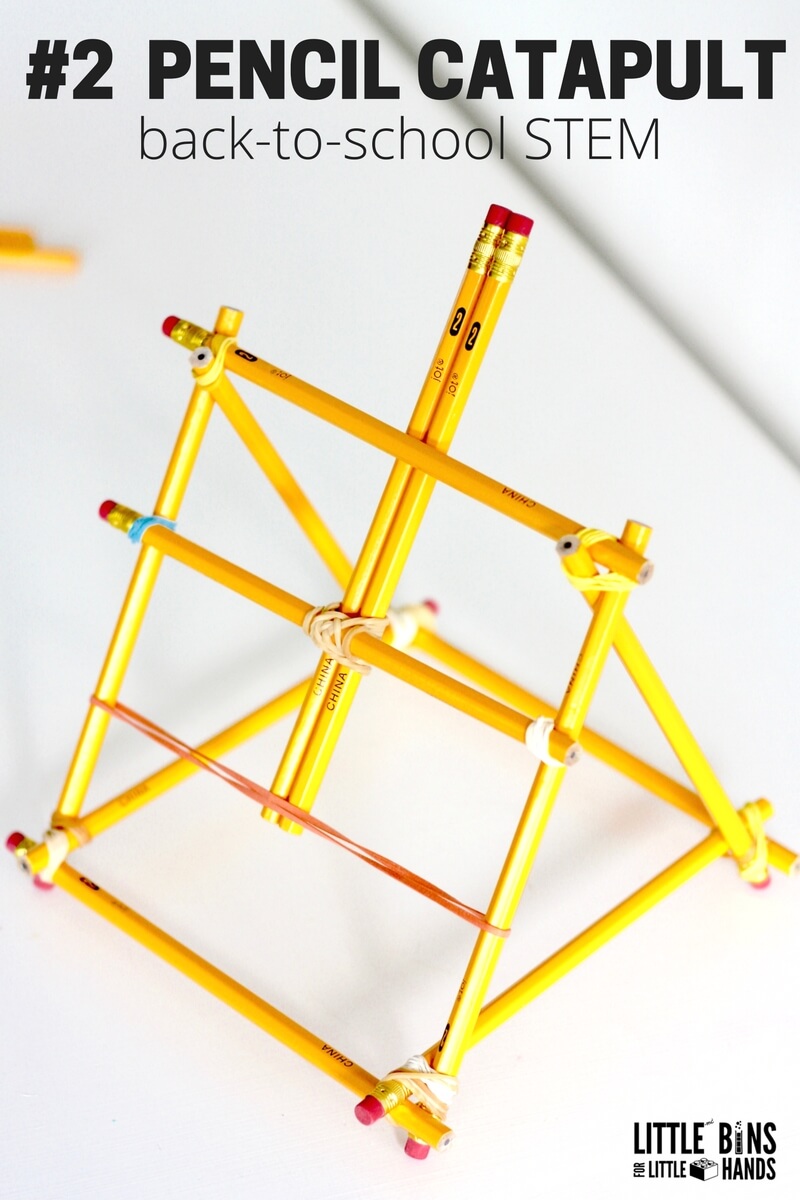
A STEM catapult project is really the cherry on top. My students sure loved attacking other castles with catapult driven projectiles. Find instructions for the one above here.


Wednesday, December 21, 2016

Addition Models


I know I had more of these pictures somewhere. Let's see if I can find where I put them.